الخميس، 18 أغسطس 2016

How to block facebook in Mikrotik using L7 Protocols


In Some Scenarios , We May need to Block Facebook Social Website or some others …In this tutorial, I will show you, how to achieve this goal using L7 (Layer7).

This tutorial consists of two parts:
1- Block facebook website for everyone on local network.
2- Allow facebook for specific host(s) and block for others on local network.
1- Block facebook website for everyone on local network.
First we check that Facebook is currently working on our local network or not?

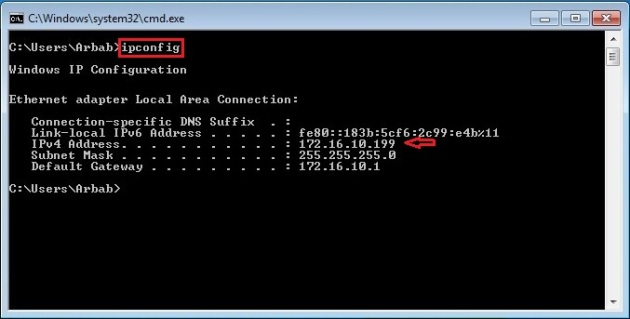
Check the IP address of our client?

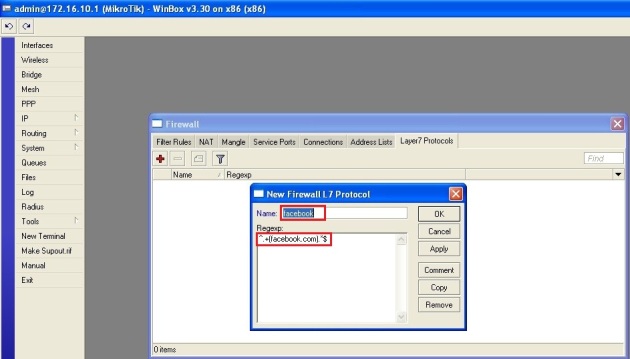
We need to create new Regexp rule at Layer7 Protocols, in order to block the facebook for our local network.
To achieve this goal, please follow these steps:


^.+(facebook.com).*$

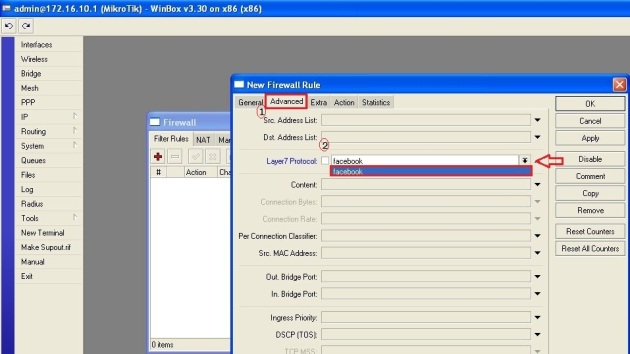
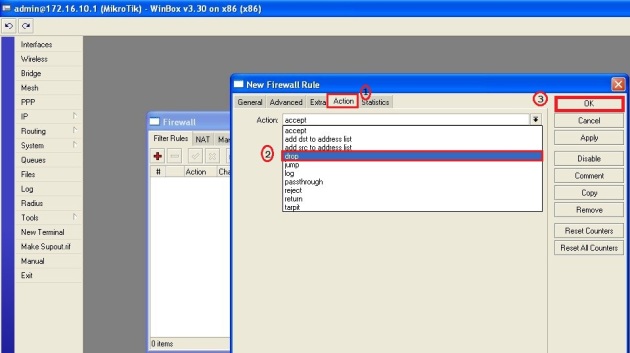
Now, we need to create Filter Rule, using these steps:


Now test the rule, that we just created:

Try also on 2nd client (172.16.10.199/24):


Check that it only block facebook or other websites also?

Oh yes, our rule is working perfectly:)
2- Allow facebook for specific host(s) and block for others on local network.
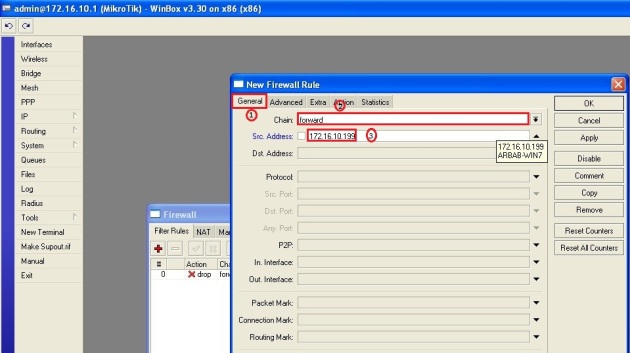
Now, we want to allow facebook for 2nd client (172.16.10.199/24) but still want to block it for other host(s).

To accomplish this goal, we need to create a second Filter rule, to do this, please follow these steps:


Move this rule at the top:

Test this rule on 2nd client (172.16.10.199/24):

Verify the rule on Mikrotik:

Verify that, facebook is still blocked for other host(s) on the local network:

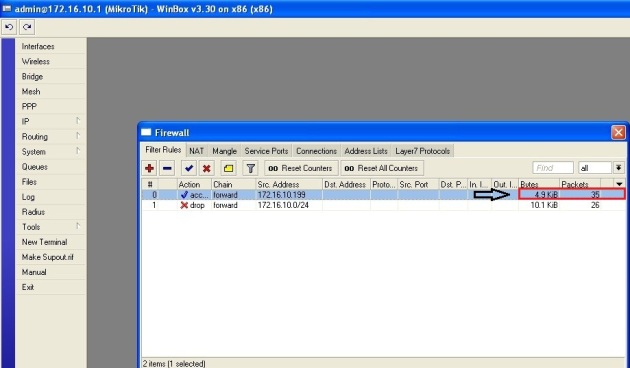
Verify the rule(s) on Mikrotik:

Drop packets rate are incremented!
We can do the same for youtube or any other website!
Hope this will help you!
Please Remember me in your prayers!

الخميس، 11 أغسطس 2016

My Mikrotik Configuration

This is my  Mikrotik configuration  that I have done some days ago. The network design is like image below.

network design

Note :
  • Mikrotik, have 2 interface. IP WAN (Public) : 1xx.9x.xx.xx/27 and the IP LAN: 10.17.123.5 & 10.17.123.6 And the version of mikrotik is 5.20 version, level 6
  • Hub or switch unmanageable.
  • Cacti : for making graph of network traffic. IP : 10.17.123.1
  • Cisco, actually is router, but there is no NAT (Network Address Translation). So the function of Cisco is like just a bridge. IP 10.17.123.1 & 10.254.128.1
  • Users, there are many users, get IP address from Cisco, 10.254.128.0/22 (DHCP).


My Mikrotik configuration is a result from command "export" in the new-terminal. Some lines have deleted, because it’s not important. IP Public has been changed etc…  (just to make secure my network :) ).  And I have changed the sequence of lines to classify according to the goal.  So that you can easily understand.
Warning…!!!
If you want to use my code configuration of Mikrotik, please be careful. Read the requirements below.
  1. You must understand the purpose of the configuration that you take.
  2. You should already understand the risks you take. Failure to do so may result in you being unable to access to the router or to access Internet.
  3. I am not responsible for your actions to perform copy and paste my code configuration.
Step 1. Basic Mikrotik Configuration.
Configuration the interface.
# feb/27/2014 11:31:59 by RouterOS 5.20
# software id = W5EY-LHT9
#
/interface ethernet
set 0 arp=enabled disable-running-check=yes disabled=no full-duplex=yes \
    mtu=1500 name=WAN speed=100Mbps
set 1 arp=enabled disable-running-check=yes disabled=no full-duplex=yes \
    mtu=1500 name=LAN speed=100Mbps

/ip address
add address=1xx.9x.xx.xx/27 disabled=no interface=WAN network=1xx.9x.xx.xx
add address=10.17.123.5/24 disabled=no interface=LAN network=10.17.123.0
add address=10.17.123.6/24 disabled=no interface=LAN network=10.17.123.0

I usually change the interface with name WAN and LAN, to make easy to remember and configure later. There are 2 IP addresses on the LAN interface.
IP address, 10.17.123.5 is gateway. Users client know this IP (if they know how to trace route the IP.), because this IP as gateway.
IP address 10.17.123.6, just administrator know about this IP. Users/client not need to know about this. This IP used to access the Mikrotik port 80, to find out the network traffic.

Configure Route (Default Gateway)
/ip route
add disabled=no distance=1 dst-address=0.0.0.0/0 gateway=1x.9x.xx.xx scope=\
    30 target-scope=10
add disabled=no distance=1 dst-address=10.254.128.0/22 gateway=LAN scope=30 \
    target-scope=10

gateway = 1x.9x.xx.xx” is a gateway for my Public IP address.
Look at carefully, I add network 10.254.128.0/22. This is the network of Users. And just this network ID that allowed to destination internet.

Configure NAT
/ip firewall nat
add action=masquerade chain=srcnat disabled=no out-interface=WAN src-address=\
    10.254.128.0/22

In my network design, Local area network (LAN) have 2 network. Yeah… 10.17.123.0/24 and 10.254.128.0/22. But, for my secure... just network 10.254.128.0/22 to be configured nat. and allowed to destination internet.

Configure IP DNS
/ip dns
set allow-remote-requests=yes cache-max-ttl=1w cache-size=2048KiB \
    max-udp-packet-size=4096 servers=8.8.8.8,8.8.4.4

At this point, the client should be able internet. Test ping from the computer (make sure the client's IP address is correct). Users get IP address from Cisco, 10.254.128.0/22 (dhcp). Do not continue with next stage, if this step has not been successful.

My Mikrotik Configuration

Step 3. Queue, Graph and more options settings.
Firewall in Mikrotik
 And the last step is rules for management bandwidth and more options settings. Many people misunderstood the purpose of bandwidth management. Bandwidth management is not the goal speed up internet connection. Or making all client have the same speed. But the goal is the bandwidth can be shared in fairness to all the clients. Fairness, that's the key. Not always fairness means all client have speed / bandwidth same. Fairness could also mean that important connections to the user will be enlarged bandwidth compared to other users.  Or essential service port will be enlarged bandwidth compared to other service ports.
Okay... before we determine the appropriate bandwidth settings. We must to know the characteristics of our network. How much total bandwidth leased to ISP ? How the distribution of bandwidth to users ? What services or applications are often used by users and so on. Another way to look at the characteristics of users, can also go through the Mikrotik, click tools - torch.

For example. In this case my network, leased bandwidth is 50 Mbps. Upload about 10Mbps. Asymmetric bandwidth. They complained, unstable internet, often slow opened the email or youtube. After checked to the location, they opened the email, while they was still downloading with idm application or torrent application. Of course, the email or youtube would be slow. They only know the internet must be smooth because they have already paid.
The conclusion of my network characteristics, what is desired users.
  1. Users often access youtube.
  2. Users often open the email application.
  3. Users often browsing.
  4. Users often play online games.
  5. Users always download via idm / torrents application.
Based on the observation, we should already know what we will do. We should be able to divide bandwidth based on application or based on destination port. The right method to devide the bandwidth is the PCQ method. 
Now, it’s time to configure. First, configure rules “ip firewall mangle”, for marking packet.
Marking download-packet from youtube.com and googlevideo.com
/ip firewall mangle
add action=add-dst-to-address-list address-list=Youtube address-list-timeout=\
    5m chain=prerouting content=youtube.com disabled=no dst-port=80 protocol=\
    tcp
add action=add-dst-to-address-list address-list=Youtube address-list-timeout=\
    5m chain=prerouting content=googlevideo.com disabled=no dst-port=80 \
    protocol=tcp
add action=mark-connection chain=prerouting disabled=no dst-address-list=\
    Youtube dst-port=80 new-connection-mark=con80you passthrough=yes \
    protocol=tcp src-address=10.254.128.0/22
add action=mark-packet chain=prerouting connection-mark=con80you disabled=no \
    new-packet-mark=down80you passthrough=yes

Marking download-package from the website (http) or the application destination port 80.
add action=mark-connection chain=prerouting disabled=no dst-address-list=\
    !Youtube dst-port=80 new-connection-mark=con80 passthrough=yes protocol=\
    tcp src-address=10.254.128.0/22
add action=mark-packet chain=prerouting connection-mark=con80 disabled=no \
    new-packet-mark=down80 passthrough=yes

Marking all download-packet, except download-packet from website or application destination port 80.
add action=mark-connection chain=prerouting disabled=no dst-port=!80 \
    new-connection-mark=notcon80 passthrough=yes protocol=tcp src-address=\
    10.254.128.0/22
add action=mark-connection chain=prerouting disabled=no new-connection-mark=\
    notcon80 passthrough=yes protocol=!tcp src-address=10.254.128.0/22
add action=mark-packet chain=prerouting connection-mark=notcon80 disabled=no \
    new-packet-mark=notdown80 passthrough=yes

Marking upload-packet that using protocol tcp.
add action=mark-packet chain=prerouting disabled=no in-interface=LAN \
    new-packet-mark=uploadtcp passthrough=yes protocol=tcp

Marking upload-packet that using all protocol, except protocol tcp.
add action=mark-packet chain=prerouting disabled=no in-interface=LAN \
    new-packet-mark=notuploadtcp passthrough=yes protocol=!tcp

The result of mangle firewall, we have 5 packet group that have marked. Down80, down80you, notdown80, uploadtcp, and notuploadtcp,
Next, determine speed for each packet group. For example,
  • Download0, Set speed 2560 kbps. Priority 1 (most priority). This type speed for down80 group.
  • Download1, Set speed 1840 kbps. Priority 2. For notdown80you group.
  • Download2, Set speed 1600 kbps. Priority 8. For down80you group
  • Upload1, Set speed 640 kbps. Priority 1 (most priority). For uploadtcp group
  • Upload2, Set speed 512 kbps. Priority 8. For notuploadtcp group
So, this is the configuration to determine some type speed.
/queue type
add kind=pcq name=Download0 pcq-burst-rate=0 pcq-burst-threshold=0 \
    pcq-burst-time=10s pcq-classifier=dst-address pcq-dst-address-mask=32 \
    pcq-dst-address6-mask=64 pcq-limit=30 pcq-rate=2560k \
    pcq-src-address-mask=32 pcq-src-address6-mask=64 pcq-total-limit=2000
add kind=pcq name=Download1 pcq-burst-rate=0 pcq-burst-threshold=0 \
    pcq-burst-time=10s pcq-classifier=dst-address pcq-dst-address-mask=32 \
    pcq-dst-address6-mask=64 pcq-limit=30 pcq-rate=1840k \
    pcq-src-address-mask=32 pcq-src-address6-mask=64 pcq-total-limit=2000
add kind=pcq name=Download2 pcq-burst-rate=0 pcq-burst-threshold=0 \
    pcq-burst-time=10s pcq-classifier=dst-address pcq-dst-address-mask=32 \
    pcq-dst-address6-mask=64 pcq-limit=30 pcq-rate=1600k \
    pcq-src-address-mask=32 pcq-src-address6-mask=64 pcq-total-limit=2000
add kind=pcq name=Upload1 pcq-burst-rate=0 pcq-burst-threshold=0 \
    pcq-burst-time=10s pcq-classifier=src-address pcq-dst-address-mask=32 \
    pcq-dst-address6-mask=64 pcq-limit=15 pcq-rate=640k pcq-src-address-mask=\
    32 pcq-src-address6-mask=64 pcq-total-limit=2000
add kind=pcq name=Upload2 pcq-burst-rate=0 pcq-burst-threshold=0 \
    pcq-burst-time=10s pcq-classifier=src-address pcq-dst-address-mask=32 \
    pcq-dst-address6-mask=64 pcq-limit=15 pcq-rate=512k pcq-src-address-mask=\
    32 pcq-src-address6-mask=64 pcq-total-limit=2000

And this is the configuration for connecting packets that has been marked (packet group) with the type of speed.
/queue tree
add burst-limit=0 burst-threshold=0 burst-time=0s comment=\
    "Download http (80)" disabled=no limit-at=0 max-limit=0 name=\
    "Download 80" packet-mark=down80 parent=global-in priority=1 queue=\
    Download1
add burst-limit=0 burst-threshold=0 burst-time=0s comment="Upload packet tcp" \
    disabled=no limit-at=0 max-limit=0 name="Upload tcp" packet-mark=\
    uploadtcp parent=global-out priority=1 queue=Upload1
add burst-limit=0 burst-threshold=0 burst-time=0s comment=\
    "Download not http (80)" disabled=no limit-at=0 max-limit=0 name=\
    "Download not 80" packet-mark=notdown80 parent=global-in priority=8 \
    queue=Download2
add burst-limit=0 burst-threshold=0 burst-time=0s comment=\
    "Upload packet not tcp" disabled=no limit-at=0 max-limit=0 name=\
    "Upload not tcp" packet-mark=notuploadtcp parent=global-out priority=8 \
    queue=Upload2
add burst-limit=0 burst-threshold=0 burst-time=0s comment="Download youtube" \
    disabled=no limit-at=0 max-limit=0 name="Download Youtube" packet-mark=\
    down80you parent=global-in priority=2 queue=Download0

Setup SNMP
Setup SNMP (simple network management protocol), so the Mikrotik can transmit data to a server cacti (10.17.123.10). In the Mikrotik version 5.20, (maybe Mikrotik version later), SNMP community public (default) can not working. For solving this problem, add the SNMP community with other name, for example public2.
/snmp
set contact=Ngeri enabled=yes engine-id="" location=Townsite trap-community=\
    public trap-generators="" trap-target=0.0.0.0 trap-version=1
/snmp community
set [ find default=yes ] addresses=0.0.0.0/0 authentication-password="" \
    authentication-protocol=MD5 encryption-password="" encryption-protocol=\
    DES name=public read-access=yes security=none write-access=no
add addresses=0.0.0.0/0 authentication-password="" authentication-protocol=\
    MD5 encryption-password="" encryption-protocol=DES name=public2 \
    read-access=yes security=none write-access=no

Setup Graph.
/tool graphing
set page-refresh=300 store-every=5min
/tool graphing interface
add allow-address=0.0.0.0/0 disabled=no interface=all store-on-disk=yes
/tool graphing queue
add allow-address=0.0.0.0/0 allow-target=yes disabled=no simple-queue=all \
    store-on-disk=yes
/tool graphing resource
add allow-address=0.0.0.0/0 disabled=no store-on-disk=yes
This is an alternative graph beside server Cacti. Remember… to view the graph, must   access IP address Mikrotik 10.17.123.6.

Options settings.
Setup clock, Network Time Protocol (NTP) client, identity and note.
/system clock
set time-zone-name=manual
/system clock manual
set dst-delta=+00:00 dst-end="jan/01/1970 00:00:00" dst-start=\
    "jan/01/1970 00:00:00" time-zone=+08:00
/system ntp client
set enabled=yes mode=unicast primary-ntp=152.118.24.8 secondary-ntp=\
    202.169.224.16

/system identity
set name=MyMikrotik

/system note
set note=Welcome show-at-login=yes

Konfigurasi Mikrotik Warnet (My Backup Configuration)

Konfigurasi Mikrotik Warnet (My Backup Configuration)

Beberapa hari yang lalu, saya selesaikan membuat konfigurasi network teman yang bikin warnet. Tentu saja ndak gratis… hahaha… Gambar networknya seperti di bawah ini. Konfigurasi yang dijelaskan disini hanya pada bagian Mikrotiknya saja. Pada bagian2 tertentu saya tambahkan sedikit penjelasan saja. Ya... setidaknya ini konfigurasi sebagai backup konfigurasi saya kedepannya... :) (Untuk hotspot dan squid bisa dilihat pada posting sebelumnya di blog ini).
Network warnet

Konfigurasi interface dan ip addressnya.
# jun/13/2014 21:00:49 by RouterOS 5.26
/interface ethernet
set 0 arp=enabled auto-negotiation=yes disabled=no full-duplex=yes l2mtu=1526 \
    mac-address=4C:5E:0C:43:30:1A mtu=1500 name="ether1 WAN" speed=100Mbps
set 1 arp=enabled auto-negotiation=yes bandwidth=unlimited/unlimited \
    disabled=no full-duplex=yes l2mtu=1522 mac-address=4C:5E:0C:43:30:1B \
    master-port=none mtu=1500 name="ether2 SQUID" speed=100Mbps
set 2 arp=enabled auto-negotiation=yes bandwidth=unlimited/unlimited \
    disabled=no full-duplex=yes l2mtu=1522 mac-address=4C:5E:0C:43:30:1C \
    master-port=none mtu=1500 name="ether3 LAN" speed=100Mbps
set 3 arp=enabled auto-negotiation=yes bandwidth=unlimited/unlimited \
    disabled=no full-duplex=yes l2mtu=1522 mac-address=4C:5E:0C:43:30:1D \
    master-port=none mtu=1500 name="ether4 HOTSPOT" speed=100Mbps

/ip address
add address=192.168.1.2/24 disabled=no interface="ether1 WAN" network=\
    192.168.1.0
add address=192.168.200.1/24 disabled=no interface="ether2 SQUID" network=\
    192.168.200.0
add address=192.168.100.1/24 disabled=no interface="ether3 LAN" network=\
    192.168.100.0

Untuk koneksi ke internet, menggunakan ADSL Telkom speedy. Modem speedy disetting sebagai bridge. Dan di mikrotik dibuat pppoe-client.
/interface pppoe-client
add ac-name="" add-default-route=yes allow=pap,chap,mschap1,mschap2 \
    dial-on-demand=yes disabled=no interface="ether1 WAN" max-mru=1480 \
    max-mtu=1480 mrru=disabled name="PPPoE TO INTERNET" password=******* \
    profile=default service-name="" use-peer-dns=no user=\
    172*******@telkom.net

Setting DNS-nya.
/ip dns
set allow-remote-requests=yes cache-max-ttl=1w cache-size=2048KiB \
    max-udp-packet-size=4096 servers=202.134.1.10,8.8.8.8

Setting default routingnya.
/ip route
add disabled=no distance=1 dst-address=0.0.0.0/0 gateway=192.168.200.2 \
    routing-mark=markwebtosquid scope=30 target-scope=10

Setting NAT-nya. Ini nat agar client bisa connect ke internet.
/ip firewall nat
add action=masquerade chain=srcnat disabled=no out-interface=\
    "PPPoE TO INTERNET" src-address=192.168.100.0/24

Ini NAT untuk client / IP-nya admin bisa connect ke modem speedy.
/ip firewall nat
add action=masquerade chain=srcnat disabled=no dst-address=192.168.1.0/24 \
    out-interface="ether1 WAN" src-address=192.168.100.2
add action=masquerade chain=srcnat disabled=no dst-address=192.168.1.0/24 \
    out-interface="ether1 WAN" src-address=192.168.200.2
Ini NAT untuk squid agar bisa connect ke internet.
/ip firewall nat
add action=masquerade chain=srcnat disabled=no out-interface=\
    "PPPoE TO INTERNET" src-address=192.168.200.2
Ini destination NAT (DNAT) agar dari internet, bisa connect ke dalam squid. Istilah lainnya agar squid bisa diremote dari luar (internet ).
/ip firewall nat
add action=dst-nat chain=dstnat disabled=no dst-port=222 protocol=tcp \
    src-address-list=half-trust to-addresses=192.168.200.2 to-ports=22
add action=dst-nat chain=dstnat disabled=no dst-port=8080 protocol=tcp \
    src-address-list=half-trust to-addresses=192.168.200.2 to-ports=80

Untuk keamanan mikrotik menggunakan firewall filter. Pertama buat dulu kelompok IP address, seperti di bawah ini.
/ip firewall address-list
add address=3*.0.0.0/8 disabled=no list=half-trust
add address=118.**.0.0/16 disabled=no list=half-trust
add address=180.***.0.0/16 disabled=no list=half-trust
add address=1**.0.0.0/8 disabled=no list=half-trust
add address=192.168.100.0/24 disabled=no list=lan
add address=192.168.200.0/24 disabled=no list=lan

Dengan adanya kelompok/group IP address seperti di atas, akan memudahkan dalam penerapan firewall filter.
/ip firewall filter
add action=drop chain=forward comment="drop invalid connections" \
    connection-state=invalid disabled=no
add action=accept chain=forward connection-state=established disabled=no
add action=accept chain=forward comment="allow related connections" \
    connection-state=related disabled=no
add action=accept chain=input disabled=no protocol=icmp src-address-list=lan
add action=drop chain=input disabled=no dst-port=!53,5353 \
    in-interface="PPPoE TO INTERNET" protocol=tcp src-address-list=!half-trust
add action=accept chain=input disabled=no dst-port=!22,8291,8080,222 \
    in-interface="PPPoE TO INTERNET" protocol=tcp src-address-list=half-trust

Setting firewall mangle, untuk meredirect web ke squid.
/ip firewall mangle
add action=mark-routing chain=prerouting comment="Redirect to Squid" \
    disabled=no dst-port=80 new-routing-mark=markwebtosquid passthrough=yes \
    protocol=tcp src-address=192.168.100.0/24

Setting firewall mangle, untuk me-mark trafik game online.
/ip firewall mangle
add action=mark-connection chain=prerouting disabled=no dst-port=\
    1818,2001,3010,4300,5105,5121,5126,5171,5340-5352,6000-6152,6675,7777 \
    new-connection-mark=GAME-ONLINE passthrough=yes protocol=tcp src-address=\
    192.168.100.0/24
add action=mark-connection chain=prerouting disabled=no dst-port="7341-7350,74\
    51,8085,9600,9601-9602,9300,9376-9377,9400,9700,10001-10011,10424" \
    new-connection-mark=GAME-ONLINE passthrough=yes protocol=tcp src-address=\
    192.168.100.0/24
add action=mark-connection chain=prerouting disabled=no dst-port=\
    19101,22100,27780,28012,29000,29200,39100,39110,39220,39190,40000,49100 \
    new-connection-mark=GAME-ONLINE passthrough=yes protocol=tcp src-address=\
    192.168.100.0/24
add action=mark-connection chain=prerouting disabled=no dst-port=\
    14009-14010,12683,5222,5223,9015,6203,6210,6217,6320,10360 \
    new-connection-mark=GAME-ONLINE passthrough=yes protocol=tcp src-address=\
    192.168.100.0/24
add action=mark-connection chain=prerouting disabled=no dst-port=\
    47611,8401-8408,8000-8010,36456,36567,36570,37466 new-connection-mark=\
    GAME-ONLINE passthrough=yes protocol=tcp src-address=192.168.100.0/24
add action=mark-connection chain=prerouting disabled=no dst-port=\
    14300,14400-14406,14500-14600,10009,30001-30003,10089 \
    new-connection-mark=GAME-ONLINE passthrough=yes protocol=tcp src-address=\
    192.168.100.0/24
add action=mark-connection chain=prerouting disabled=no dst-port=\
    13933,14001-14999,31928,31929,5222,5223,10074,28941 new-connection-mark=\
    GAME-ONLINE passthrough=yes protocol=udp src-address=192.168.100.0/24
add action=mark-connection chain=prerouting disabled=no dst-port="1151,1293,14\
    79,6100-6152,7777-7977,9401,9600-9602,12020-12080,30000,40000-40010" \
    new-connection-mark=GAME-ONLINE passthrough=yes protocol=udp src-address=\
    192.168.100.0/24
add action=mark-connection chain=prerouting disabled=no dst-port="42001-42052,\
    10112,10201-10210,10294-10295,11100-11125,11440-11460,16400-16410,18061,19\
    223" new-connection-mark=GAME-ONLINE passthrough=yes protocol=udp \
    src-address=192.168.100.0/24
add action=mark-connection chain=prerouting disabled=no dst-port=\
    8001-8010,40100-42000,12060-12070,27005-27015,31929,9647,42406-42441 \
    new-connection-mark=GAME-ONLINE passthrough=yes protocol=udp src-address=\
    192.168.100.0/24
add action=mark-connection chain=prerouting disabled=no dst-port=\
    15100-15200,9001-9099,39030-39040,42106,42423,17327,17565 \
    new-connection-mark=GAME-ONLINE passthrough=yes protocol=udp src-address=\
    192.168.100.0/24
add action=mark-connection chain=prerouting disabled=no dst-port=\
    9339,843,8890 new-connection-mark=GAME-FACEBOOK passthrough=yes protocol=\
    tcp src-address=192.168.100.0/24
add action=mark-connection chain=prerouting disabled=no dst-port="10402,11011-\
    11041,12011,12110,13008,13413,15000-15002,16402-16502,16666,18901-18909,19\
    000" new-connection-mark=GAME-ONLINE passthrough=yes protocol=tcp \
    src-address=192.168.100.0/24
add action=mark-packet chain=forward connection-mark=GAME-ONLINE disabled=no \
    new-packet-mark=GAME-PAKET passthrough=yes
add action=mark-packet chain=forward connection-mark=GAME-FACEBOOK disabled=\
    no new-packet-mark=GAME-PAKET passthrough=yes

Setting firewall mangle, untuk me-mark trafik hit squid
/ip firewall mangle
add action=mark-packet chain=postrouting disabled=no dscp=12 new-packet-mark=\
    proxy-hit passthrough=yes
add action=mark-packet chain=prerouting disabled=no dscp=12 new-packet-mark=\
    proxy-hit passthrough=yes

Tutup service port yang tidak digunakan.
/ip service
set telnet address="" disabled=yes port=23
set ftp address="" disabled=yes port=21
set www address="" disabled=no port=80
set ssh address="" disabled=no port=22
set www-ssl address="" certificate=none disabled=yes port=443
set api address="" disabled=yes port=8728
set winbox address="" disabled=no port=8291

Untuk pembagian bandwidth (queue), saya masih percaya sama queue simple.
/queue simple
add burst-limit=0/0 burst-threshold=0/0 burst-time=0s/0s direction=both \
    disabled=no interface=all limit-at=0/0 max-limit=0/0 name=TOTAL \
    packet-marks="" parent=none priority=1 queue=default-small/default-small \
    target-addresses="" total-queue=default-small
add burst-limit=0/0 burst-threshold=0/0 burst-time=0s/0s direction=both \
    disabled=no interface=all limit-at=0/0 max-limit=1M/1M name=GAME \
    packet-marks=GAME-PAKET,dns-mark parent=TOTAL priority=8 queue=\
    default-small/default-small target-addresses="" total-queue=default-small
add burst-limit=0/0 burst-threshold=0/0 burst-time=0s/0s direction=both \
    disabled=no interface=all limit-at=0/0 max-limit=10M/10M name=HIT-PROXY \
    packet-marks=proxy-hit parent=TOTAL priority=1 queue=\
    default-small/default-small target-addresses="" total-queue=default-small
add burst-limit=0/0 burst-threshold=0/0 burst-time=0s/0s direction=both \
    disabled=no interface=all limit-at=0/0 max-limit=256k/512k name=admin \
    packet-marks="" parent=TOTAL priority=8 queue=default-small/default-small \
    target-addresses=192.168.100.2/32 total-queue=default-small
add burst-limit=0/0 burst-threshold=0/0 burst-time=0s/0s direction=both \
    disabled=no interface=all limit-at=0/0 max-limit=256k/440k name="User 1" \
    packet-marks="" parent=TOTAL priority=8 queue=default-small/default-small \
    target-addresses=192.168.100.3/32 total-queue=default-small
add burst-limit=0/0 burst-threshold=0/0 burst-time=0s/0s direction=both \
    disabled=no interface=all limit-at=0/0 max-limit=256k/440k name="User 2" \
    packet-marks="" parent=TOTAL priority=8 queue=default-small/default-small \
    target-addresses=192.168.100.4/32 total-queue=default-small
add burst-limit=0/0 burst-threshold=0/0 burst-time=0s/0s direction=both \
    disabled=no interface=all limit-at=0/0 max-limit=256k/440k name="User 3" \
    packet-marks="" parent=TOTAL priority=8 queue=default-small/default-small \
    target-addresses=192.168.100.5/32 total-queue=default-small
add burst-limit=0/0 burst-threshold=0/0 burst-time=0s/0s direction=both \
    disabled=no interface=all limit-at=0/0 max-limit=256k/440k name="User 4" \
    packet-marks="" parent=TOTAL priority=8 queue=default-small/default-small \
    target-addresses=192.168.100.6/32 total-queue=default-small

Ini script untuk memantau squid, jika squid tidak connect, secara otomatis trafik web tidak akan melewati proxy squid, melainkan langsung menuju ke internet. Dengan demikian client tidak akan terdisconnect.
/system script
add name=down policy=\
    ftp,reboot,read,write,policy,test,winbox,password,sniff,sensitive,api \
    source=":log info \"Squid Proxy Server is not responding. Please Check Con\
    nectivity\"\r\
    \n/ip firewall mangle disable [find comment=\"Redirect to Squid\"]"
add name=up policy=\
    ftp,reboot,read,write,policy,test,winbox,password,sniff,sensitive,api \
    source=":log info \"Squid Proxy Server is OK.\"\r\
    \n/ip firewall mangle enable [find comment=\"Redirect to Squid\"]"

/tool netwatch
add comment="Cek Squid" disabled=no down-script="/sys script run down" host=\
    192.168.200.2 interval=45s timeout=1s up-script="/sys script run up"

Settingan lainnya.
/system clock
set time-zone-name=Asia/Makassar

/system identity
set name=MikroTik

/system ntp client
set enabled=yes mode=unicast primary-ntp=152.118.24.8 secondary-ntp=\